Equipment Review: Jag35 NEX-FS700 Baseplate and D|Support

 Posted by at 10:06 pm on February 16, 2014
Feb 162014
 

On our last trip to the Solomon Islands, Nate and I were faced with an equipment challenge: we needed to capture high-speed footage of small songbirds [specifically Chestnut-bellied Monarchs (Monarcha castaneiventris)] for our upcoming film about speciation – the process by which new species arise.

We were on a tight budget, so the obvious choice for a camera was the Sony NEX-FS700, a relatively inexpensive rental that can easily be adapted to work with our Canon EF lenses and can shoot up to 240 frames per second in Full HD resolution, albeit in short bursts. The challenge was not choosing the camera, however; it was supporting the camera with a very large lens: the Canon EF 500mm f/4L IS, which weighs more than 8 lbs.

The big Canon telephoto is too heavy to hang off the front of the camera without tearing off the camera’s lens mount (or destroying the Metabones adapter that lets us use our EF lenses on the Sony camera). The Sony NEX-FS700, on the other hand, is not small enough to hang off the back of the lens the way you can use an SLR; we didn’t trust the strength of the lens mount (this concern may have been misplaced), but more importantly, such an arrangement would be very back-heavy and difficult to maneuver. We contacted Jag35, because we’ve been very pleased with their other products (like their Full Shoulder Rig v2), and they offered to let us use a prototype of their new NEX-FS700 baseplate.
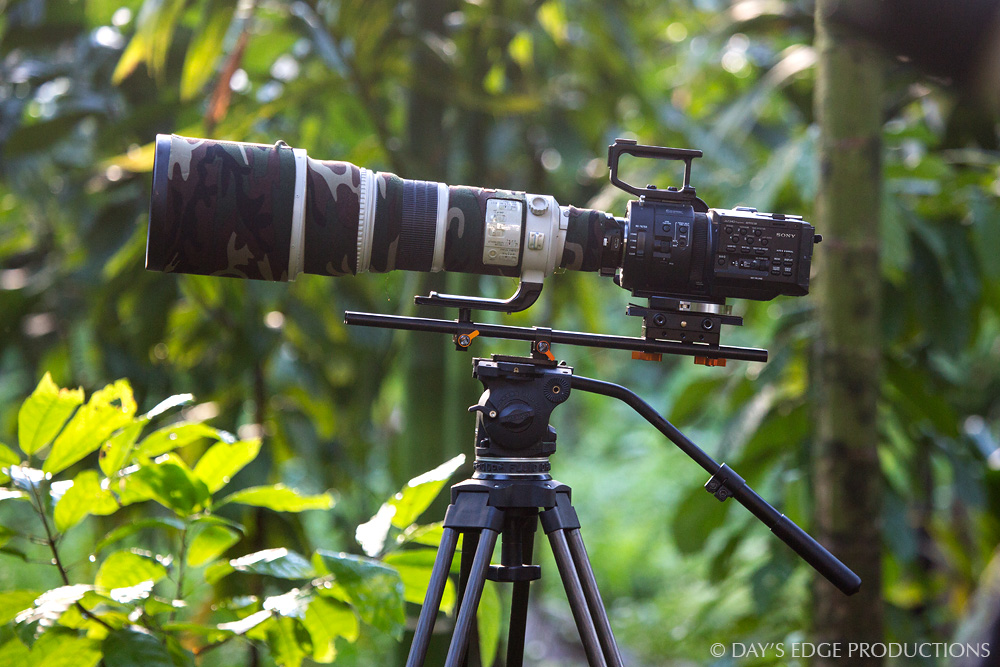
The telephoto setup in the field: Cartoni tripod and fluid head, Jag35 FS700 Baseplate and D|Support, Sony NEX-FS700 with Metabones EF Adapter and Canon EF 500mm f/4L IS lens.

The telephoto setup in the field: Cartoni tripod and fluid head, Jag35 FS700 Baseplate and D|Support, Sony NEX-FS700 with Metabones EF Adapter and Canon EF 500mm f/4L IS lens.

The Jag35 FS700 Baseplate integrates seamlessly with the rest of their accessories –their camera plates, shoulder rigs, and follow focus systems are modular and based around standard 15mm aluminum rods, to which various accessories attach. The FS700 Baseplate has a quick-release system that allows you to attach the FS700 camera on top, and also comes with a sturdy, dedicated tripod plate on the bottom (to which you can attach, for example, a quick-release plate for your fluid head of choice).

Using a long set of rods (we had 20” rods), we were easily able to balance the Sony FS700 with the 500mm Canon lens (and even with the Canon 1.4x teleconverter at times). Because the tripod plate and FS700 baseplate slide independently along the rods, it’s easy to balance your rig on the tripod, even when your rig is as large and unwieldy as ours was!

The final element that made this work was a prototype of the Jag35 D|Support, which allowed us to provide a second point of support for the heavy lens. With the camera attached to the FS700 Baseplate and the lens foot of the 500mm attached to the D|Support, the resulting setup was big and heavy, but also rigid and surprisingly easy to balance and maneuver, thanks to the sliding tripod plate.
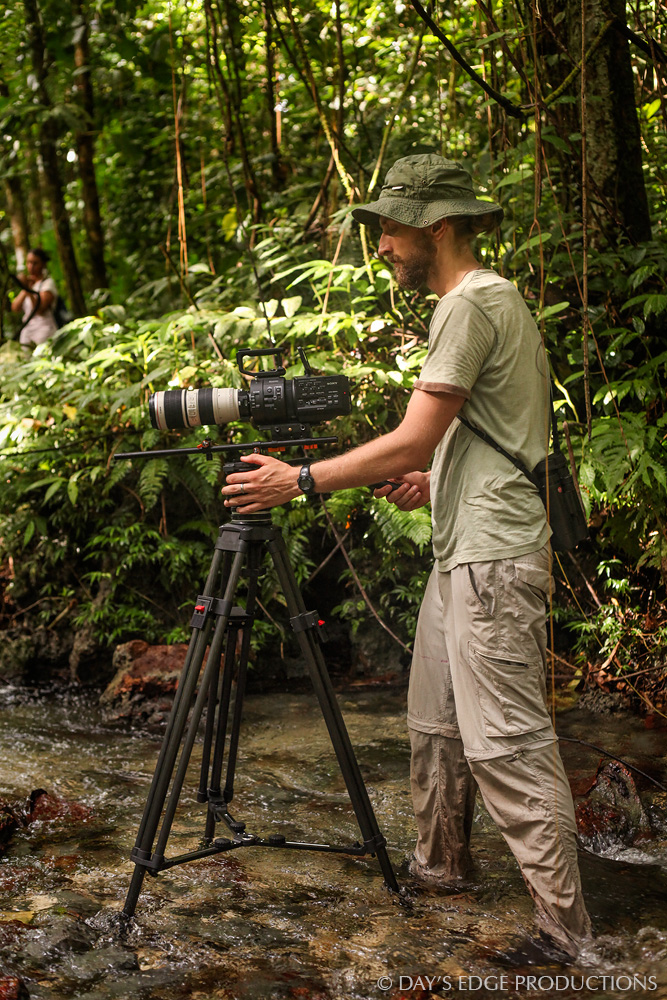
Neil using the FS700 and Canon 70-200mm lens on the Jag35 FS700 Baseplate (this time, without the D|Support)

Neil using the FS700 and Canon 70-200mm lens on the Jag35 FS700 Baseplate (this time, without the D|Support)

We also used the FS700 with a variety of shorter lenses. With small lenses like the Canon 16-35mm f/2.8 or the 50mm f/1.4, the FS700 doesn’t really need the Jag35 FS700 Baseplate to balance properly on a tripod (though you still might find the whole rod system helpful to mount an external viewfinder, light panel, or follow focus). But with the Canon 70-200mm f/2.8L IS or Sigma 180mm f/3.5 Macro, the lens is fairly heavy and having the rod system and the sliding tripod plate made it much easier to balance the whole rig. Note that with a mid-sized lens like this, the 20″ rods are longer than necessary, but they don’t get in the way. With these lenses (which are much smaller than the 500mm, but still fairly heavy), we attached the D|Support to the lens foot when we had the time, but we also occasionally hung the lenses off the front of the camera without a second point of support. The rigidity of the setup with the D|Support was significantly better than without – this is a solid accessory if you’re going to be using an FS700 (or, very likely, an FS100) with any of these larger lenses.

The verdict: Overall, we would definitely recommend the Jag35 FS700 Baseplate and D|Support. They are solidly built, simple, and easy to use. We felt quite confident mounting our big, unwieldy telephoto rig onto our tripods – and even slinging it over our shoulders to hike through the rainforest – knowing that the Jag35 gear was holding it all together.

Equipment Review: Jag35 Full Shoulder Rig v2

 Posted by at 5:47 pm on June 10, 2013
Jun 102013
 

from on .

DSLR cameras have revolutionized many aspects of independent filmmaking, bringing high quality Full HD video into a compact, familiar package and allowing users to take advantage of the huge range of accessories available with established SLR camera systems. Unfortunately, DSLRs aren’t really built for video shooting, and there are a whole range of ergonomic difficulties to be overcome if you want to use them in a serious video production. Two of those difficulties are shooting stable footage without a tripod, and following a moving subject with manual focus.


A whole industry has sprung up to provide accessories for DSLR video shooters, and one of the companies whose products interested us was Jag35. We contacted Jag35 to see whether they would be willing to provide some gear for our documentary about speciation in the Solomon Islands, and they graciously agreed. Now, with three short expeditions under our belt using the Jag35 Full Shoulder Rig v2 and Sidekick Follow Focus v2, we’ve gained enough experience with these products to write a review.


First, the Jag35 Full Shoulder Rig v2. The point of a shoulder rig is to get the camera out of your hands (unstable!) and onto your shoulder (more stable). To make the whole setup as stable as possible, most shoulder rigs have a counterweight behind the shoulder that balances the weight of the camera so that your (shaky) hands don’t need to. After reviewing the plethora of shoulder rig possiblilities, the Jag35 Full Shoulder Rig v2 looked like a great choice for DSLR video shooting on the go, and we were excited to try it out.


We found the Full Shoulder Rig v2 to be comfortable, well balanced, and stable. The rig makes capturing smooth static and moving shots much easier than handheld — a huge improvement over shooting handheld. The ergonomics are also great. All of the adjustment knobs (a snazzy orange color, by the way) are large enough to allow for easy, quick adjustments, but not so large that they get in the way. Most of the rig is aluminum, so the rig is also very durable. Aluminum parts also keep the rig pretty lightweight. Its construction is modular, so you can break it down quickly into very compact, manageable components (excellent for traveling and filming expeditions that requiring trekking).


One of our favorite features of the rigs is how easy it is to reconfigure into a variety of forms. The full shoulder rig is an “offset” configuration, meaning that while the rig sits on your shoulder (the right shoulder in the standard configuration), the DSLR mounting plate is offset to the left, so the DSLR’s LCD screen is right in front of your face. We’ve also used the included components to assemble a compact shoulder rig (without the counterweight behind the shoulder) and a counterbalanced top-handle rig for moving handheld low-angle shots. The rig can be tripod-mounted. Since the rig uses industry-standard 15mm rails, you can attach lots of accessories without modification. If necessary, the supplied rails can be replaced with longer rails to accommodate larger gear. On an upcoming shoot, we’ll be using a new external monitor, and we’ll be able to re-configure the rig — using some longer rails, not included — into a straight (non-offset) form to accommodate this additional accessory. Easy!


Overall, we’ve been really impressed with the build quality and versatility of the Jag35 Full Shoulder Rig. Neither Nate nor I have worked with some of the more expensive options (those made by Zacuto, Redrock Micro, etc.), but based on our experience with the Jag35 rig, we don’t see any reason to spend more!


Finally, just a few minor caveats: when fully assembled, the shoulder rig is not small, and has a slightly awkward shape. We tried carrying it, fully assembled, on some long hikes over rough terrain, and that wasn’t fun. So don’t do that. It’s pretty quick to break down and set up again, so that’s the way to go if you’re moving around a lot.


The only improvement we could think of, and one that would be easy to implement, would be to add a quick-release system on the camera mounting plate. The best option would probably be the standard Arca-style system, perfect for all those photographers who are transitioning into shooting more video.


Overall verdict: This is a solid piece of gear and makes a huge difference when you’re shooting video without a tripod. Definitely recommended.

Stay tunned for our review of the SideKick Follow Focus V2.
Here is their video about the rig:

Equipment review: Think Tank Hydrophobia 70-200 Flash

 Posted by at 8:23 am on April 2, 2013
Apr 022013
 

Day’s Edge Productions just returned from a 2-week filming expedition in the Solomon Islands with Dr. Al Uy of the University of Miami. Knowing that it was the rainy season, and not wanting the rain to cramp our style, we asked Think Tank if they would give us two Hydrophobia® camera rain covers to use on location. They kindly agreed and, as expected, the Solomon Islands gave us plenty of chances to put the Hydrophobias through their paces!

Think Tank Hydrophobia Flash 70-200.

First, what does this rain cover do? Basically, the Think Tank Hydrophobia allows you to operate your DSLR camera in the rain without having to worry about your camera or lens getting wet. It consists of a well-fitted waterproof fabric cover with holes in just the right places for your hands and the front of the camera lens. It’s also got a nice internal attachment loop that goes around the base of the lens and allows you to carry the whole setup by an external strap (rather than using your own camera strap, which is inside the cover). Both Nate and I got the Hydrophobia® Flash 70-200, which has an additional transparent flash cover that allows you to use a large professional flash, like the Canon 580EX flashes that we use most often, attached to the camera’s hot shoe.

Here’s what we liked, based on our use of the Hydrophobia covers in the Solomon Islands:

1) The Hydrophobias did their job, and did it well. We were never worried that our cameras were getting wet, even in the heaviest downpour that we encountered. The waterproof material is sturdy and the seams look like they’ll last a long time. These things look and feel durable, and we expect them to wear well.

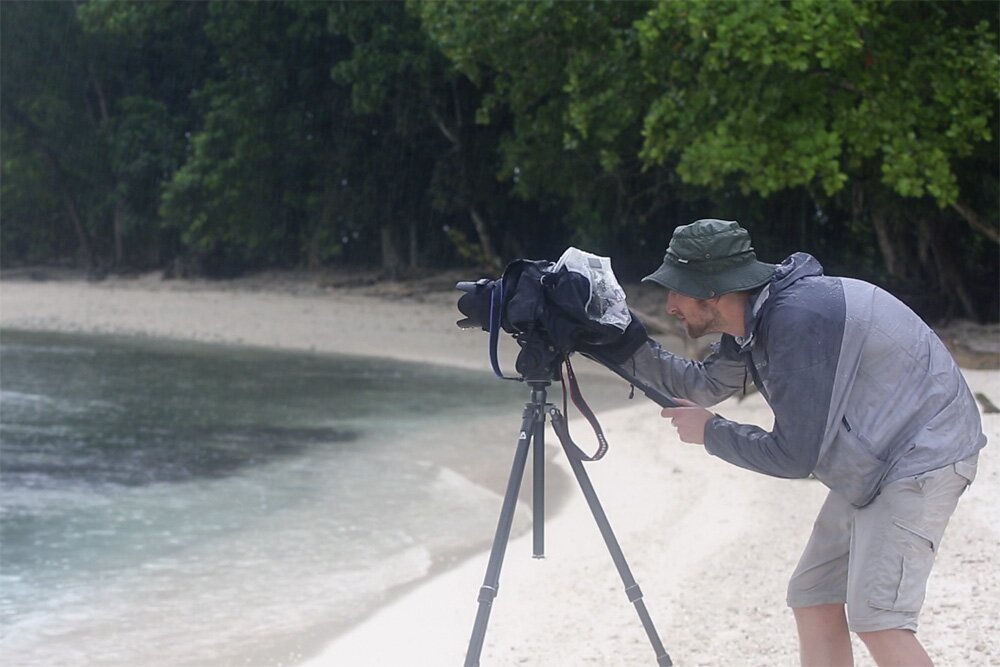
2) The openings in the rain cover are well positioned to allow you to manipulate the camera controls — right hand for most of the shooting controls on the Canon 5D Mark II or 5D Mark III, and the left hand for focusing, zooming, and operating miscellaneous controls on the left side of the camera body. There’s enough room to move your hands around inside the cover, but not so much extra room that it feels baggy. The bottom / left hand opening also allows you to mount the camera to a tripod or monopod with the cover attached, which we did while shooting video in the rain.

Neil shooting video in the rain on Frigatebird Island with the Hydrophobia 70-200 Flash on his Canon 5D Mark III and 70-200mm lens.

3) This thing is really well thought out! There are lots of little details that make the Hydrophobia more functional, which we’ve come to expect from Think Tank. There’s a waterproof lens cap that you can quickly slip over the front of your lens hood when you’re done shooting. There’s a transparent flap, secured with Velcro, that you can use to cover the viewfinder when you’re not shooting (or when you’re shooting in Live View mode). The eyepieces (required for use; not included) are specific to each model of camera, and fit the cameras securely. The Hydrophobia mounts to these eyepieces very securely by means of a stretchy neoprene collar that grips the outer rim of the eyepiece. You can even keep an extra eyepiece in a little pocket on the outside of the Hydrophobia.

So overall the Hydrophobias are a pretty slick solution to a common problem: shooting in the rain. In a place like the Solomon Islands, particularly in the wet season, we couldn’t let rain limit our shooting options, and the Hydrophobias let us keep shooting in some pretty camera-unfriendly conditions, from downpours in the forest to rainy sea crossings from island to island in small, bouncing boats.

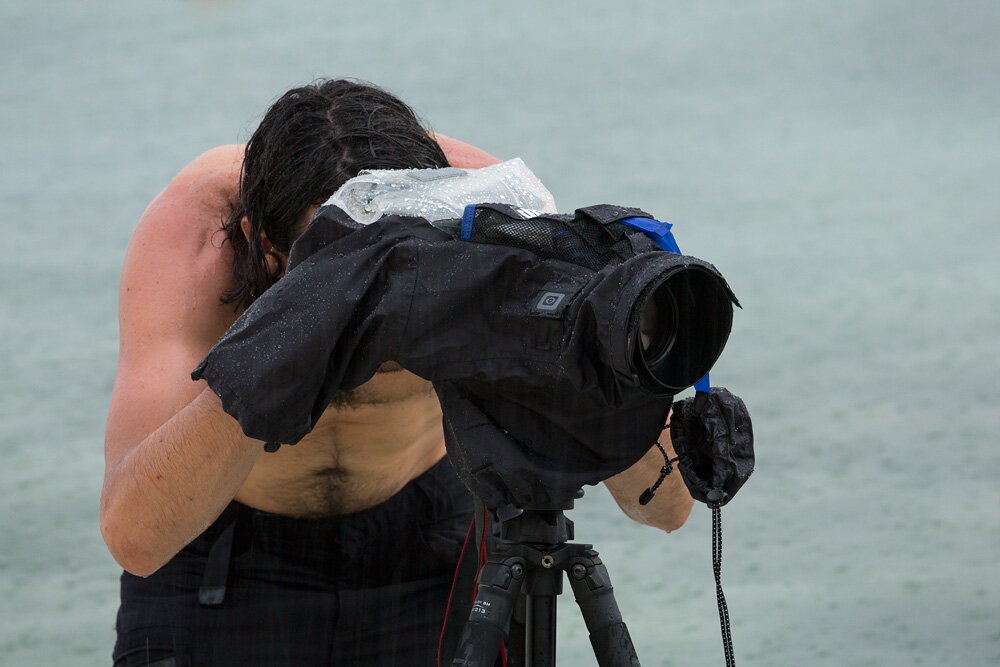
Nate using the Hydrophobia 70-200 Flash in heavy rain on the beach. The camera inside is a Canon 5D Mark III with an 80-200mm lens.

There were a few things that we found challenging when working with the Hydrophobias. First, as the name suggests, they really are made for 70-200mm lenses, and they’re best used with these larger lenses. We tried using the Hyrdrophobia with smaller lenses, and it can be done, particularly if the smaller lens has a decent-sized lens hood. The material covering the lens bunches up somewhat around shorter lenses, however — it was a bit tricky to access the focus and zoom rings of my 24-105mm f/4L lens with the Hydrophobia on. But it can be done, and having the option of using these smaller lenses definitely came in handy. Second, the Hydrophobia is at its best when you’re using the camera’s optical viewfinder. When shooting video (or stills with Live View enabled), the neoprene eyepiece collar and surrounding Velcro obscure the top edge of the LCD screen, so you won’t see 100% of the frame. That being said, we shot plenty of video with the Hydrophobia covers on, and we quickly learned to adapt. The clear plastic that covers the camera back can also get fogged up in very humid conditions, or with rapid temperature changes, but I was stupid and didn’t apply the (included) anti-fog coating to the plastic before the trip. I’m sure this would have solved the problem. Third, as someone with big hands, I found that there wasn’t quite enough room for me to reach in through the lower/left hole and adjust the zoom of the lens when the camera was attached to a tripod head like the Really Right Stuff BH-55 ballhead or Manfrotto 501 fluid head (a smaller tripod head, or smaller hands, would have been fine). Finally, if you’re not planning on using a flash very often, you’re probably better off with the non-flash version of the cover. The transparent flash “bubble” is a great feature, but stowing it away securely when you’re not using a flash isn’t trivial.

Conclusion: This is definitely a product we’ll be taking with us on our next trip to the Solomon Islands in June (with any luck, we can also try the Hydrophobia® 300-600 model to cover our supertelephoto needs when we’re shooting wildlife in the rain!). It’s a much more ergonomic and mobile solution for shooting in the rain than using an umbrella or rain jacket to cover your camera, both favorite strategies of ours in the past! We would recommend a Hydrophobia rain cover to anyone whose photographic work can’t wait for fair weather.

Mar 052013
 

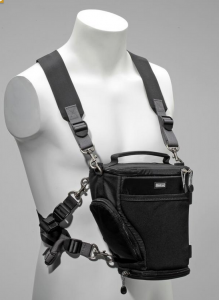
For Christmas this year, my wife Liz got me the Think Tank Digital Holster™ 40 v2.0 and the Digital Holster™ Harness v2.0. I knew that the first months of 2013 would involve some adventurous photo and video expeditions, and I wanted a solution that would keep my camera close at hand, but also keep both of my hands free. Since I knew I’d be visiting the Rwenzori Mountains and the Solomon Islands, two very rainy places, I also wanted a solution that would keep my camera protected from the elements (this ruled out some popular camera carrying devices like the Cotton Carrier).

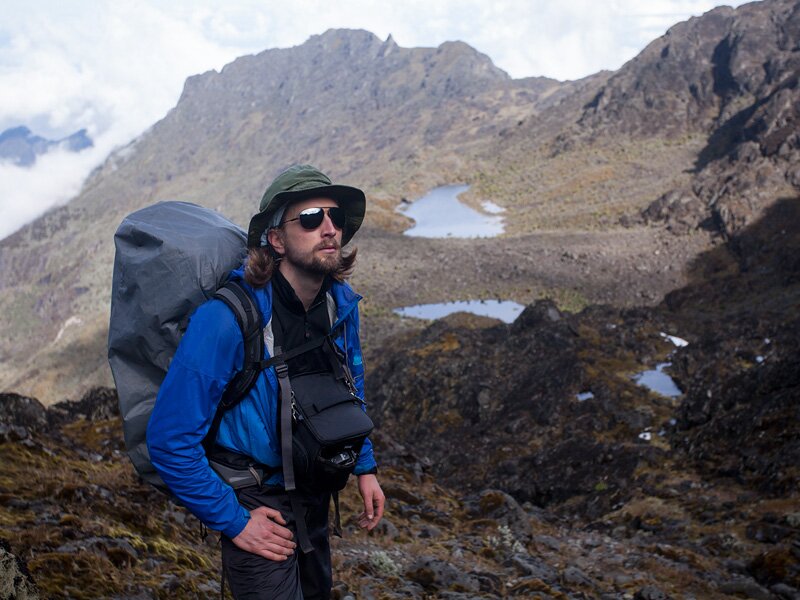
Here I am with the Digital Holster and Harness system, during our ascent of Mt. Speke. Photo by Nate Dappen.

So, now that we’re back from the Rwenzoris, how did the Digital Holster™ fare? Well, overall I was very glad that I brought the Digital Holster™ and Harness combination on this expedition. Here’s what I liked about it:

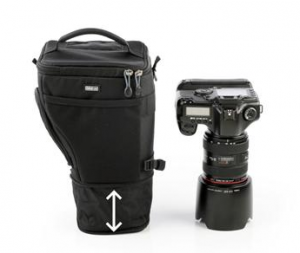
1) The Holster: The “Holster” itself is a solid little bag (not surprisingly for Think Tank, the build quality is excellent). Even though I shoot with a 5D Mark II and a 7D body, I opted for the Digital Holster™ 40 (which is designed to accommodate a full-sized pro SLR), because I like to leave my Really Right Stuff L-plates attached to my cameras at all times, and these make the camera body a bit bigger. I didn’t regret getting the larger holster (the other option was the Digital Holster™ 20). As it was, there wasn’t an abundance of extra room in the holster, and I’m not sure the 20 would have comfortably fit my camera with a 70-200mm f/2.8 lens and the lens foot attached. Oh, and the zip-out extension for longer lenses is really convenient, accommodating my 70-200mm f/2.8 lens (with the hood reversed) with a bit of room to spare, but collapsing to a smaller size when I wasn’t carrying the big lens. When I wasn’t using the chest harness, the holster provided enough protection for my camera that I was confident stuffing the whole thing in my backpacking pack while we were climbing some of the bigger peaks.

2) The Harness: The Harness was very comfortable, distributing the weight of the bag evenly across my shoulders. Even when I was carrying the 5D Mark II and 70-200mm lens, the whole setup was quite comfortable, which was important since I was climbing mountains most of the day. I also appreciated the low profile of the straps – instead of cushioning the load with bulky padding, they spread the weight of your camera across your shoulders with wide, thin straps that even have breathable mesh in the back so you don’t get too sweaty under them. The harness attaches to the Holster with a system of six straps that’s a bit complicated and definitely confusing at first. But once you get the hang of it, it’s pretty easy to get on and off, and the harness holds the holster very securely against your chest.

Digital Holster™ 40 v2.0. Photo from Think Tank.

3) Bells and whistles: The Digital Holster™ has some nice extra features, the kind of details I’ve enjoyed in other Think Tank products that I’ve used. It’s got a nice integrated rain cover, which I used on several occasions in the Rwenzoris. My camera never got wet. There are a couple of nice little pockets, one outside and one inside the lid (I used the inside pocket for memory cards and batteries). There’s also a nice stretchy pocket on the front of the holster (the side away from your chest), which I often used to carry accessories like a Rode Videomic. There’s a nice attachment that allows you to attach the holster to a belt, and some accessory straps where you could attach an extra lens pouch or something on the outside of the holster.

Overall, I was very happy with the Digital Holster™ 40 v2.0 and the Digital Holster™ Harness system. That being said, there are a few small things that could be improved.

1) When the Holster is perched on your chest, the lid opens away from you (which is good), but this makes the zipper somewhat tricky to access against your chest when it’s fully closed, especially if you’re wearing gloves. I’m not sure what the best solution to this issue would be, but I didn’t find the zipper placement to be ideal for quick access to the camera.

2) The attachment points for 4 of the 6 straps of the harness are very small webbing loops, and it was sometimes difficult (especially with cold hands or gloves) to connect the clips of the harness to these little loops on the holster. Once connected, however, I didn’t have any doubt that they would stay connected. Rather than deformable webbing loops, maybe small metal D-rings or something would make donning and removing the harness quicker.

3) While I used the rain cover several times, and it did a pretty good job staying on the holster, I think some kind of attachment (maybe Velcro or a snap closure) to secure the top of the rain cover to the top / rear of the Holster (i.e. the top of the side of the Holster that rests against your chest) would make the rain cover more secure.

Digital Holster™ Harness v2.0. Photo from Think Tank.

Finally, one limitation of the bag that is not a shortcoming of engineering, but simply an unavoidable consequence of this kind of bag: I found that once we got into really gnarly terrain, where I needed to use my hands and feet to climb, I really didn’t want the camera on my chest any more. On steep rocks, your instinct is to keep your center of mass as close to the rocks as you can, so you just don’t want something like an SLR in between you and the surface you’re clinging to. When we were climbing rocks, I put the holster in my backpack, and I was much happier that way.

To summarize, I think the Think Tank Digital Holster™ 40 v2.0 and Digital Holster™ Harness make a great camera-carrying solution for backcountry trekking. The build quality, degree of gear protection, and level of comfort are all excellent. In my case, I used the Digital Holster™ to keep my most-used camera and lens readily accessible on the trail, while I kept other, less frequently used items in a larger photo backpack. Despite a few minor shortcomings, I will take this combination with me – without hesitation – the next time I’m on a photo expedition that requires extended hiking in challenging terrain.